
Installing Visio onto an Existing Office installation with PSADT and Intune
When using the regular Office 365 deployment in Intune there are a few limitations. If you want to change the current installation (add or remove apps) Intune doesn’t handle some perquisites. For example: if you choose to deploy Microsoft Visio to an existing installation, it won’t install as long as Office apps are open. This means the installation will fail and Visio won’t install. You will be greeted with the error ‘The user has cancelled the installation’.
Most customers use Teams or S4B and that means that one or more Office apps are open most of the time.
I contacted Microsoft concerning this issue, but unfortunately they don’t have a solution. That’s when I started my own research on the open source market to find a solution. Then I stumbled across the PSAppDeployToolkit. The creators describe it as follows:
The PowerShell App Deployment Toolkit provides a set of functions to perform common application deployment tasks and to interact with the user during a deployment. It simplifies the complex scripting challenges of deploying applications in the enterprise, provides a consistent deployment experience and improves installation success rates.
This Toolkit allows us to force close some applications before we start an installation and it’s exactly what we need! Let’s set this up and integrate this into Intune!
If you want a general overview of what PSADT does, check out this blog from TimmyIT. I will focus on how to integrate it with Intune & Visio specifically.
Configuring the ODT
Before being able to install Office with PSADT, we need to get the right installation files for Office.
Grab yourself the Microsoft Office Deployment Toolkit and configure your XML through config.office.com. The configuration of this XML is pretty easy, just keep in mind to:
After configuring the XML, it will look something like this:
<Configuration>
<Add OfficeClientEdition="64" Channel="Monthly">
<Product ID="VisioProRetail">
<Language ID="en-us" />
</Product>
</Add>
<Updates Enabled="TRUE" Channel="Monthly" />
<Display Level="None" AcceptEULA="TRUE" />
<Property Name="AUTOACTIVATE" Value="1" />
<Logging Level="Standard" Path="%temp%" />
</Configuration>I named the XML: InstallO365withVisio.xml. Add all the files for Office (so setup.exe and the XML) in the ‘Files’ Folder from PSADT.
Configuring PSADT for installation
The next step is to dive into the toolkit. Start off by downloading the latest version from Github. This will give you a zip file which will unzip into a few different folders.

The most important file is ‘Deploy-Application.ps1’, because that’s where the magic happens. Here we can configure the installation and uninstall behavior of our apps. We will start by configuring the necessary variables (starting at line 63)
##*===============================================
##* VARIABLE DECLARATION
##*===============================================
## Variables: Application
Variables: Application
$appVendor = 'Microsoft'
$appName = 'Visio'
$appVersion = ''
$appArch = 'x64
$appLang = 'EN'
$appRevision = '01'
$appScriptVersion = '1.0.0'
$appScriptDate = '25/08/2019'
$appScriptAuthor = 'Thijs Lecomte'
After configuring these variables we scroll down to line 114, this is the pre-installation block. In this block, we define the actions that the package needs to take before beginning the install of our application. In our case, we want to make sure all Office Applications and Windows Explorer are closed before the installation.
##*===============================================
##* PRE-INSTALLATION
##*===============================================
[string]$installPhase = 'Pre-Installation'
## Show Welcome Message, close Internet Explorer if required, allow up to 3 deferrals, verify there is enough disk space to complete the install, and persist the prompt
Show-InstallationWelcome -CloseApps excel,groove,onenote,outlook,mspub,powerpnt,winword,iexplore,teams,visio,winproj' -CheckDiskSpace -PersistPrompt
## Show Progress Message (with the default message)
Show-InstallationProgress

##
The next step is the installation step, here we will configure the installation process for Visio . All our installation files are located in the ‘Files’ folder, this can be located by using the ‘$dirfiles’ variable in PSADT. You can find these lines on line 141 of our Deploy-Application.ps1
## Perform Installation tasks here
Execute-Process -Path "$dirFiles\setup.exe" -Parameters "/CONFIGURE InstallO365withVisio.xml"
Configuring PSADT for uninstallation
I will not go into details concerning the uninstallation procedure, because it’s pretty much the same as the installation process. You just need to create another XML file for ODT and include Visio in the processes you want closed before the uninstallation. I will provide a link to GitHub repo at the end of the blog where you can find all the necessary code.
User Interaction
It’s important to note that the ‘Show-InstallationWelcome’ function only shows this message to the user in the context which script is running in. Because most of my users aren’t local administrators on their devices, we need to run the installation of this app in a system context. But this means PSADT shows the messages in the system context. We need to show these messages to the currently logged in user.
That’s where the ServiceUI comes in. ServiceUI is t ool from MDT which finds the currently logged in user and shows your messages to him, while still executing the installation process in System context. I copied the ServiceUI.exe file from an MDT installation, but it’s in the Github repo I will link in the end if you want to download it.
The ServiceUI.exe needs to be placed in the same folder as the Deploy-Application.exe.
Packing it all up
Once we have all our files and scripts, we need to pack it into an .intunewin file, so we can deploy it as Win32 app in Intune. For this, we use the Content Prep Tool (new version of the Intune Wrapper). Start the tool and use the following variables
- Source Folder: Root folder of the Deploy-Application.exe file
- Setup File: Deploy: Application.exe
- Output folder: A temporary folder to copy to .intunewin file to.

Adding the Win32 app in Intune
The final step before installing the application is adding it into Intune.
Navigate to to the Intune portal, select clients apps, add and choose the ‘Windows app (Win32)’ type. Finally browse for the intunewin file we just created.

Configure the App Information and click Next.

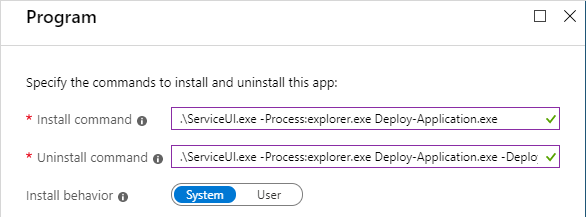
In the program section we will specify our install and uninstall commands. In these commands use MDT’s ServiceUI and call our Deploy-Application.exe application.
The full commands are:
- Install: .\ServiceUI.exe -Process:explorer.exe Deploy-Application.exe
- Uninstall: .\ServiceUI.exe -Process:explorer.exe Deploy-Application.exe -DeploymentType Uninstall
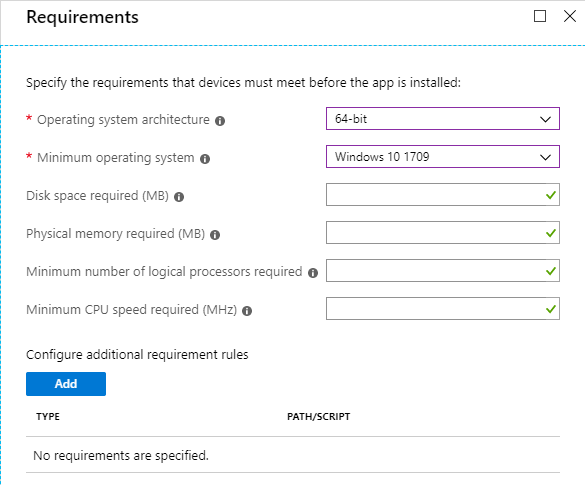
The next step is configuring the Requirements. As I deploy the 64-bit of Visio, I require a 64-bit OS architecture and require 1709.
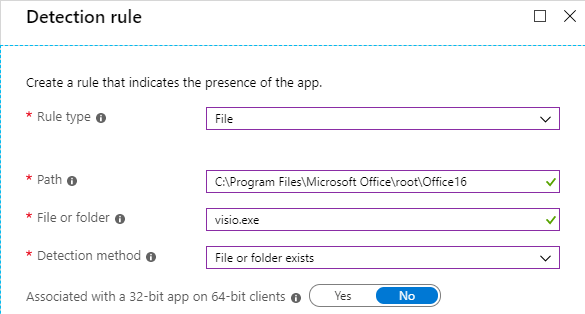
Detecting the Visio installation is pretty simple. I check for the visio.exe to be present in the Office 2016 folder.
If you are happy with all the configured settings, click ‘Add’ to finalize this deployment to Intune.

An app won’t do you any good unless you assign it though, that’s why I assign it as available to my Visio group.
This group is also used for Group Based licensing. So all an admin has to do to provide Visio to a user, is put him in the correct group! Long live automation!

End user experience
If the users visits the Company Portal, he will be greeted with a brand new app for him to install!

In this test case, I have 3 Office Applications open:
- Teams
- Outlook
- Excel

When the app is downloaded, PSADT will kick in and try to close the applications. The toolkit will minimize all current apps so the message is shown in the foreground. The user now hastwo options:
- Close apps manually and click continue ‘Continue’
- Let PSADT force close our apps by clicking ‘Close Programs’
Both options have the seem affect in the end.

After the user closes the apps, the installation process kicks in:

When the installation is done, your user will be greeted with a message that the app is ready and now Visio is ready for use!

The sky is the limit
The Powershell App Deployment Toolkit is a really cool open-source toolkit. If you are handling a lot of software installations (through Intune, SCCM, BigFix or another program), you should look into it. Besides user interaction it also allows for complex installations.
All the installation files can be found in Github.
Categories

That is all that I get:
PS E:\temp\visio> .\Deploy-Application.ps1
At E:\temp\visio\Deploy-Application.ps1:236 char:52
+ Show-DialogBox -Text $mainErrorMessage -Icon ‘Stop’
+ ~
The string is missing the terminator: ‘.
At E:\temp\visio\Deploy-Application.ps1:114 char:75
+ … deploymentType -ine ‘Uninstall’ -and $deploymentType -ine ‘Repair’) {
+ ~
Missing closing ‘}’ in statement block or type definition.
At E:\temp\visio\Deploy-Application.ps1:56 char:5
+ Try {
+ ~
Missing closing ‘}’ in statement block or type definition.
At E:\temp\visio\Deploy-Application.ps1:239 char:1
+
The Try statement is missing its Catch or Finally block.
+ CategoryInfo : ParserError: (:) [], ParseException
+ FullyQualifiedErrorId : TerminatorExpectedAtEndOfString
LikeLike
This was very helpful, thanks for sharing. The PSADT provides good information to the end users and the branding customisation helps it looks good.
LikeLike
Great, but I cant find the link to Github!
LikeLike
It’s here: https://github.com/ThijsLecomte/Intune/tree/master/PSADT
LikeLike