
Retire non-compliant devices through Power Automate
With the 2003 release of Microsoft Endpoint Microsoft, a new compliance setting was introduced to retire non compliant devices. It sounds like this would automatically retire non-complaint devices, but this is not the case.
If a non-compliant has this setting assigned, the device shown up in the ‘Retire noncompliant devices’ section in the MEM portal. In here the administrator has the option to retire a device or clear the device state.

Overview
I had high hopes for this setting as I was expecting some kind of automation. But there is nothing we cannot do with Power Automate and the Graph API.
I was inspired by Courtenay Bernier post‘s on how to utilize Power Automate and Intune.
During this blog post I will walk you through setting up a flow which will post a message to a Teams channel of your choice which will enable the administrator to choose the appropriate retire action for the device.

After a member of the Teams channel has made his choice, the selected action will be performed on the device.
Setting it up
In order to setup this up, a few steps need to be taken.
- Setup the compliance policy
- Configure a Sharepoint list to keep track of last run
- Configure Teams
- Create an app registration
- Create the flow
Compliance policy
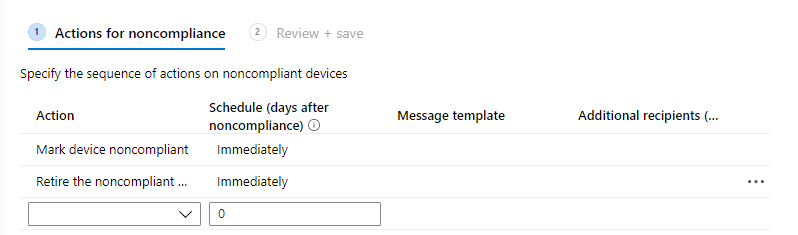
The first step is to configure the non-compliant action ‘Retire non-compliant device’.
Navigate to your compliance policy, click ‘edit actions’ and add the ‘Retire noncompliant device’ step.
The schedule is something you should configure to your liking. This is the value that specifies after how many days a device should show up in the ‘retire non-compliant devices’ list. In our case, this means how soon an IT admin has an option to retire a device. The minimum is 0, the maximum is 365. In my test environment, I have configured it for 0 days, this obviously isn’t advised in a production environment.
Sharepoint list
In order to save the last successful run date of the flow, I utilize a Sharepoint list which is retrieved by the Flow (liked outlined by Courtenay’s post). This allows us to retrieve the devices
Create a Sharepoint list of your choosing, add the current date as the Title of the item with ID ‘1’. The format of the date should be ’05/24/2020 07:54:22′.
Teams setup
In order to send adaptive cards to a Teams channel, the Flow bot needs to be added to the team. Keep in mind that everyone in this team will be able to retire non-compliant devices, so it’s paramount to add the flow bot in a team with a limited amount of members.

Click the plus sign to add a new tab. 
Search for ‘Flow’. 
Click ‘Add’ to add the Flow bot to the team. 
Click save to add the bot to the team.
App registration
To get the necessary permissions to get all the pending non-compliant devices and to retire any devices, an app registrations needs to be created.
Navigate to the Azure Portal > Azure Active Directory > App registrations.
Create a new app registration and configure the permission ‘DeviceManagementConfiguration.ReadWrite.All’ with application permissions.
Add an application secret and save the secret, application ID and tenant ID for later.
Flow 1 – Post card
This solution consists of two flows. One to get all the non-compliant devices, one to post the adaptive cards to Teams. Because Flow waits until the adaptive card is responded to, there is no way to put this all together in one flow. Otherwise, only one adaptive card would be posted and the next one would only be posted if the previous one was responded to.
The lay-out of the flow is pretty simple:
- We receive an HTTP request from the second flow
- The flow posts the adaptive card with the information to Teams
- A ‘switch statement’ determines the action that was taken on the adaptive card
- A confirmation is posted on Teams and the action (retire/cancel retire) is taken.

The first step is a ‘When a HTTP request is received’ trigger with the following Request body:
{
    "type": "object",
    "properties": {
        "deviceName": {
            "type": "string"
        },
        "operatingSystem": {
            "type": "string"
        },
        "ownership": {
            "type": "string"
        },
        "compliancePolicy": {
            "type": "string"
        },
        "deviceID": {
            "type": "string"
        }
    }
}
Copy the HTTP Post URL from this step, we will need this one later.
The next step will post the adaptive card to Teams, I have uploaded the json source code for the adaptive card to Github. I configured this using the adaptive cards designer, which is a very easy method to visually create adaptive cards.
Select the Team and Channel where you previously added the flow bot to. Set ‘Should update card’ to ‘Yes’, this means that the card will update when a response has been provided. The ‘Update message’ parameter contains the text that will be added when the card is added. This provides a visual marker for others to know if a card has already been answered.
The next piece is the switch statement, which determines what the response was to the adaptive card. The ‘on’ property should be ‘body(‘PostToTeams’)[‘body’][‘submitActionId’]’, where ‘PostToTeams’ is the name of the step that posts the adaptive card.
We have two cases for the switch, one for the retire action, one for cancel retire. Both of these are almost identical. Each have two steps, the first is to send a confirmation message to Teams, the second one is an HTTP function which calls the Graph API.
For the HTTP call, the method should be POST and the URI utilized is ‘https://graph.microsoft.com/beta/deviceManagement/deviceCompliancePolicies/setScheduledRetireState’
The body contains the deviceIDs of the devices and the actions. For retire this would be:
{
“managedDeviceIds”: [
@{triggerBody()?[‘deviceID’]}
],
“state”: “ComfirmRetire”
}
With this code, we retrieve the deviceID dynamically from our previous flow. The ‘state’ for the ‘clear device state’ is ‘CancelRetire’.

As these HTTP steps call the Graph API, we utilize ‘Active Directory OAuth’ authentication. Fill in your Tenant ID, client ID and application secret from the app registration you created previously. The audience should be ‘https://graph.microsoft.com’.

Flow 2 – Get devices
Now that the first flow is in place to post the adaptive cards and execute the necessary action, we need to create the flow which will retrieve the non-compliant devices and trigger the firsts flow. The outline of the flow is as follows:
- Through recurrence the flow is triggered
- It queries the non-compliant devices through the Graph API and parses the results.
- It gets the Timestamp from Sharepoint
- Runs through the devices and checks if they are recent, if they are the second flow is triggered.
- After the flow has run, the Sharepoint Timestamp is updated with the current date.

The first step (recurrence) is something you can configure to your liking. I have set it up that it runs every day, but you could configure it to run hourly, every week etc…
The second step that queries the Graph API is pretty straight forward. This is a HTTP action that executes a GET request to ‘https://graph.microsoft.com/beta/deviceManagement/deviceCompliancePolicies/getDevicesScheduledToRetire’. The tenant ID, client ID and application secret from the app registration should be filled in again.

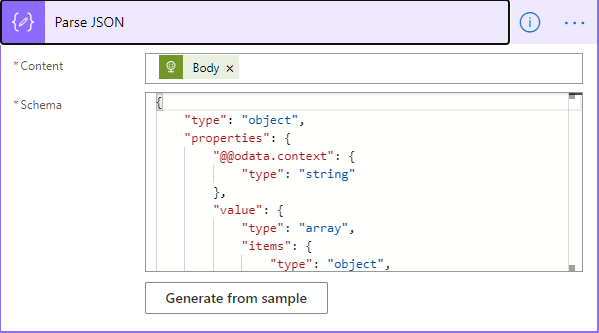
The ‘Parse JSON’ step parses the output from the HTTP step above so that we can use the output in upcoming actions. The schema can be found on Github as well.
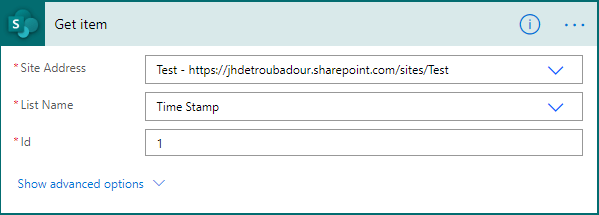
The next step retrieves the Timestamp from Sharepoint, make sure to configure the correct site, List Name and ID of the Timestamp item here.
The next part loops over all the non-compliant devices, checks if they are recent and execute the first flow which posts the adaptive card.
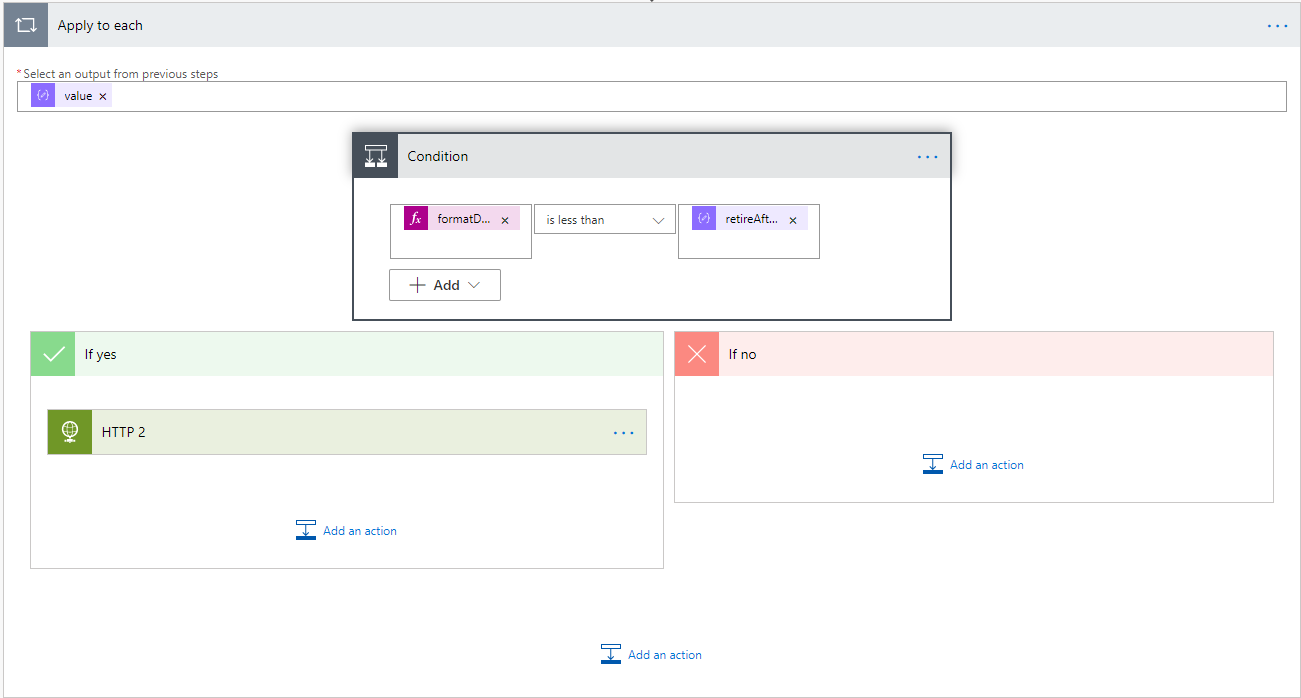
The condition block contains the following statement:
- formatDateTime(body(‘Get_item’)[‘Title’]) is less than items(‘Apply_to_each’)?[‘retireAfterDateTime’]
It checks if the ‘retireAfterDateTime’ is smaller than the Timestamp from Sharepoint. This means that only devices that became non-compliant after the last time the flow ran will be posted to Teams.
If the conditional equals to true, we want to execute our first Flow. We do this by adding an ‘HTTP’ step with as method POST and the URI of the first flow. This URI can be found in the ‘When a HTTP request is received’ step of the first flow. The body is as follows:
{
“deviceName”: “@{items(‘Apply_to_each’)?[‘managedDeviceName’]}”,
“operatingSystem”: “@{items(‘Apply_to_each’)?[‘deviceType’]}”,
“ownership”: “@{items(‘Apply_to_each’)?[‘ownerType’]}”,
“compliancePolicy”: “@{items(‘Apply_to_each’)?[‘deviceCompliancePolicyName’]}”,
“deviceID”: “@{items(‘Apply_to_each’)?[‘managedDeviceId’]}”
}

This step will provide all the information that the first flow uses to post the adaptive card and execute the action.
The last step in the flow updates the Timestamp on Sharepoint with the current Datetime. That way the next time the flow runs, only new non-compliant devices will posted.

Testing it out
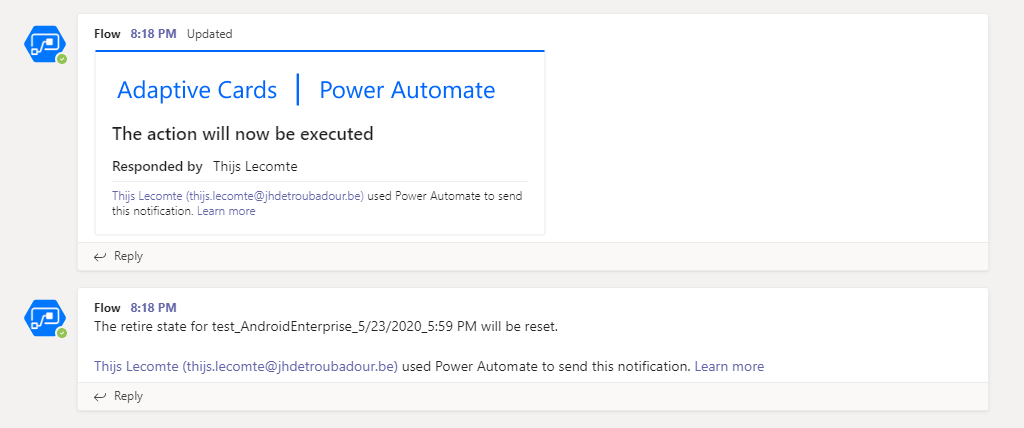
To test out the flows, we can manually trigger the second flow. The experience of an IT administrator will be as follows:

This enables the IT administrator to quickly retire old, non-compliant devices with checking the portal manually everyday.
Download
I have exported both flows as .zip files so you can easily import these flows into your own environment.
Both flows can be found on my Github account.
Summary/thoughts
Note: The Graph API calls didn’t work properly with application permissions and this was confirmed to be a bug. The bug was partially fixed in the 2007 release. The Graph API endpoints work correctly now, but still throw an error.
Big thanks to Dave Chomas, who helped me bring this bug to light and addressed it with the Intune engineering team.
This blog post is a first step into automating the retiring of non-compliant devices. These flows can be adapted to your own needs. You can change the conditional statement to only post devices with a certain compliance policy or only Windows 10 devices. Or you could configure it to automatically retire devices without posing the question through Teams.
All the Graph API actions are currently in beta and aren’t recommended for production use. When these come into the 1.0 version of Graph, this blog post will be updated to reflect that.
I am curious about your thoughts on this. Would you utilize something like this in your organization, do you think some kind of automation should come native into Intune? Let’s discuss!
Categories

would it be possible to upload the flow once again? thank you
LikeLike
Hi Christian
I forgot to add them indeed, I have uploaded them to GitHub now => https://github.com/ThijsLecomte/Intune/tree/master/RetireNonCompliantDevices
LikeLike